Friday, 26 August 2011

Photography 1: TAOP, Ex Outdoors at Night

Project: Available light.
Exercise: Outdoors at night.

For this exercise I took pictures to explore the variety of lighting effects and colour in artificial light.  When taking exterior pictures at night that include the sky, I ensured that the sky was not completely black.  Dusk was the best time, when there was just a hint of light in the sky, and the building appeared more clearly.

The photographs taken are shown below:

5675.jpg; F11; 3s; Daylight WB


5676.jpg; F11; 3s; Tungsten WB
The two photographs above were taken at dusk from outside a brightly lit house.  The first photograph was taken using a white balance setting of daylight.  For the second,  the white balance was set to tungsten.  The tungsten white balance setting gives an attractive blue cast to the night sky.  In order to achieve a bold blue colour, there must still be some brightness in the sky.


1936.jpg; F2.8; 1/50s
This image was taken from a poorly lit underground car park into the entrance of a Chinese supermarket.  The colours are predominantly yellow.  The light is provided by relatively harsh fluorescent lights.

1939.jpg; F2.8; 1/80s

This photograph was taken in a busy, brightly lit Chinese supermarket.  The overall yellow colour of the image is mainly due to the bright yellow coloured floor.  This colour is reflected onto the ceiling by the bright lighting.  There is some relief from the yellow colour from the red items and clothing of the people within the store.


Auckland at Night; F27; 3s
The photograph above of the Auckland skyline was taken just as the light from the sky was beginning to fade.  Some light remained in the sky and this has helped to show the outlines of the buildings more clearly.

Candle Lamps; F22; 2.5s
The photograph above was taken outside at night.  The only light available was from the candles.  The candles provide a warm yellow light.

1940.jpg; F4.8; 1/5s
The photograph above is of a floodlit pub.  The photograph was taken hand held and this has resulted in a slightly blurred image.

1941.jpg; F2.8; 1/10s
This image is of a floodlit hotel.  The cars parked in front of the hotel helped to hide the floodlights.

1943.jpg; F2.8; 1/8s

1946.jpg; F2.8; 1/4s

The two photographs above were taken at Luton Hoo in Bedfordshire.  The building is now an upmarket hotel.  The hotel owners have lit each of the majestic buildings with warm white lighting.  This lighting gives a more inviting feel to the buildings.

1949.jpg;F2.8; 1/8s
This church in Harpenden is floodlit with a yellow light.  This form of lighting, although possibly cheaper to run gives a harsh colour to the building.

1952.jpg; F2.8; 1/40s
This Chinese restaurant has been floodlit with sophisticated white light.

5677.jpg; F22; 6s
5681.jpg; F22; 8s
5679.jpg; F22; 8s
The three photographs above were taken from a flyover above the M1 in Bedfordshire.  The lights of the cars and slow shutter speed have produced interesting effects in the images.  In the third image, (5679)  the lines of light have a zigzag effect.  This was due to a car passing over the bridge I was on during the exposure.  I have included it due to its interesting effect.

What have I learned from this exercise?

The variety of colours present at night are many.  Many buildings look more impressive when floodlit at night.  The choice of floodlight colour is important to achieve a desirable effect.

Shops and internal spaces are often more dramatic when brightly lit and viewed from the dark street outside.

When photographing a brightly lit interior of a building, setting the white balance to tungsten gives an attractive blue cast to the night sky.  In order to achieve a bold blue colour, there must still be some brightness in the sky.

Friday, 19 August 2011

Photography 1: TAOP, Ex Symbols

Project: Illustration
Exercise: Symbols

The idea of this exercise was to find symbols for a number of concepts.  Below I have suggested symbols for each concept, and added a short note for each explaining how I might use them in a photograph.


Growth  A seed or seeds starting to grow.  Although this is quite a cliché a photograph could show an acorn starting to grow with a shoot and small leaves visible.  Also plant shoots appearing through soil in spring time would symbolise growth.

Child outgrowing clothes.  A person bursting out of too small clothes could be used as a symbol of growth.

Excess  Cup running over.  Liquid poured into a cup or glass, and beginning to overflow would be a strong symbol of excess in a photograph.

Overeating.  A photograph of a person eating an excessively large sandwich would symbolise excess.

Drunken reveller lying in the street.  A person clearly drunk, lying in the street would suggest excess.

Crime  Broken window with a hand reaching in.  A photograph of a broken window in a door, with a person's hand reaching in to steal something would be symbolic of crime.

A police officer handcuffing a prisoner would symbolise that a crime may well have been committed.

Silence  Silent forest.  An image of a misty forest would suggest silence.

A still, snowy scene would impart a feeling of silence.

Silence could be symbolised in a photograph by having a person using sign language toward to viewer.

Poverty  Down and out begging.  A photograph of a down and out or tramp begging on the street would symbolise poverty.

Hungry children.  Children shown looking thin a staring at an empty plate would imply poverty.

Coins in a hand.  A few, low value coins held in a dirty hand would give the impression of poverty.

What have I learned from this exercise?

In order to symbolise a particular concept in a photograph without being either too clichéd or too obscure is quite difficult.  In order to work, the symbol must be recognisable.  The best way to come up with an original photograph is to research the subject thoroughly and too think laterally.


Friday, 12 August 2011

Photography 1: TAOP, Ex A Narrative Picture Essay

Project: Narrative
Exercise: A narrative picture essay.

For this exercise I chose to photograph an event.  The event I chose was the Really Wild Food and Countryside Festival held in St David's Pembrokeshire in July.  The event is held over two days and includes interesting foods, rural traditions, storytelling and alternative lifestyles.  The event aims to Promote and showcase locally grown or produced food, or wild ingredients foraged from the hedgerows, coast, beach and river.

I have arranged the images so as to tell a story of the event:
Pembrokeshire Guild of Weavers, Spinners and Dyers.  Using traditional hand spinning wheels to spin sheep's wool ready for knitting and weaving.

A Guild member hand spinning dyed wool for weaving.

The dyed and spun wool is woven into cloth on a hand loom.

Alternative lifestyles were displayed such as this Yurt.  The Yurt is designed for year-round living.


Small portable ovens allow food to be cooked near to where it is found.

Pembrokeshire Falconry displayed a selection of hunting birds and owls.
Large Eagle Owl.
Large Owl
The Icelandic Horse Society of Great Britain were present with a number of their horses.
The Icelandic is the original horse of the Vikings, taken to Iceland over a thousand years ago and pure bred ever since.
There were activities for all ages, such as this artificial climbing wall.
Interesting food was cooked to order.  The food available included locally caught seafood and food gathered from the hedgerows.
Food cooked in the open air.
Many stalls selling home made delicacies were to be found in the main marquee.

Friday, 5 August 2011

Photography 1: TAOP, Ex Cloudy Weather and Rain

Project: The time of day.
Exercise: Cloudy weather and rain.

For this exercise, I photographed the same scenes in sunlight and under cloud.  The white balance was set to sunlight/daylight.  The subjects chosen were a building, a person, and a street scene.  These pairs of images were put together and the number of f-stops' difference between the sunny and cloudy versions was noted.  Also I looked to see whether there was a colour difference.

5636.jpg; F13; 1/250s; Sunny

5660.jpg; F9.5; 1/60s; Dull
For each reduction in aperture, the amount of illumination entering the camera halves.  This is because the area of the circular opening is halved.  Also the same effect is achieved through each change in shutter speed.  In practice, one stop down to a slower speed accompanied by one stop down to a smaller aperture makes no change to the exposure.

In this pair of images there is a difference of 4 stops due to shutter speed and 2 stops due to aperture.  This gives a total difference of 6 f-stops.

The image in dull light is slightly bluer than the image in the sunshine.  I prefer the image taken in the bright light because the form of the objects in the scene are better defined.

5628.jpg; F8; 1/180s; Sunny

5608.jpg; F8; 1/20s; Dull

The exposure difference between the two images is 6 f-stops.  I prefer the image created in the dull light as the model's features are softer and there are no severe shadows.

5636.jpg; F13; 1/250s; Sunny

5660.jpg; F9.5; 1/60s; Dull

The exposure difference between the two images is 6 f-stops.  I prefer the image created under the bright light because the form of the building is better defined.

When clouds cover the sun, the shadows are softer and the shadow edges less distinct.  The subject is more evenly lit but not so definitely "modelled" - it looks flatter, with a less obvious form.


White Tree Flowers
This image was created under dull light.  The subtle colours and textures are clearer under subdued light than they would be under bright light.

Next I took 3 photographs outdoors, on an overcast day, that make good use of the enveloping, shadowless light.

5621.jpg; F8; 1/125s; Cloudy Conditions.
The shadowless light in this image has allowed the fine relief on the thorn branch to be seen clearly.

5618.jpg; F8; 1/90s; Cloudy Conditions.
Here the different textures can be clearly seen under the subdued light.

5612.jpg; F8; 1/60s; Cloudy Conditions.
The strong colour of this flower is seen to good effect in the shadowless light.

5639.jpg; F9.5; 1/60s.
Rain drops on a black car bonnet.

5651.jpg; F8; 1/60s.
Rain drops caught in a spider's web.

What have I learned from this exercise?

The exposure difference between a photograph taken in bright sunlight and under cloud is approximately 6 f-stops.  Images created under cloud are very slightly bluer.

Photographs of people and brightly coloured objects are often better when created under overcast or cloudy conditions.

Rain can produce interesting visual effects, so poor weather does not forbid the taking of good images.

For each reduction in aperture, the amount of illumination entering the camera halves.  This is because the area of the circular opening is halved.  Also the same effect is achieved through each change in shutter speed.  In practice, one stop down to a slower speed accompanied by one stop down to a smaller aperture makes no change to the exposure.

Tuesday, 12 July 2011

Photography 1: TAOP, Ex Shiny Surfaces

Project: Photographic Lighting.
Exercise: Shiny Surfaces.

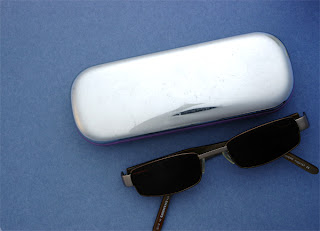
Objects with surfaces that reflect brightly, such as chrome or silver, are a special lighting problem.

For this exercise I used a shiny glasses case.  It was so shiny that you could see your face in it.  The object was placed on a flat surface so that it could be photographed from above.  A light was set up close to the camera.  A photograph was taken with this set up for reference.


5587.jpg; Reference image.

A large sheet of tracing paper was rolled into the shape of a long cone so that the wide end would sit around the object, (but out of view), and so that it tapers upwards to the small end, which fitted just around the lens.  The length of the cone was exactly the distance from the camera to the subject.  A second photograph was taken.

5589.jpg; With cone diffuser.

I then experimented with the light in different positions and at different distances.  I also tried changing the angle of the object slightly.  A photograph was taken of each setup.

5590.jpg; Light behind camera.

5591.jpg; Light to side, 1.5m away.

5592.jpg; Object turned slightly.

What have I learned from this exercise?

In order to photograph shiny objects successfully, set the proper environment.  Using a light tent where the light is very well distributed is key, (as created with the tracing paper in this exercise). If you do not have a light tent, create this environment by diffusing your light sources.

Set up the lights in a manner that will not reflect anything on the object. Take some sample pictures and see how they look. If they are not right, move the lights. Some positioning options are: above the object or in front of the object on either side.

Only let the light tent open enough to let the lens of your camera through. This will keep the camera reflection out of your photo. Do not use a lens hood. Being above the object and shooting in a downward angle is a good option, when possible. Shoot the object with as much opaque portions as possible facing the lens of your camera.

Monday, 11 July 2011

Photography 1: TAOP, Ex Contrasts and Shadow Fill

Project: Photographic Lighting
Exercise: Contrast and Shadow Fill

For this exercise I set up a simple still-life.  Room was left for access at the sides of the set.  The scene was shot from the same level as the objects.  A light was fixed about 2-3 feet to one side of the objects and at their level, so that it was aimed at right angles to the camera's view.

The first photograph was taken without a diffuser in front of the lamp and the second with a diffuser.  These were followed with a series of 5 exposures using the diffused light.  The light and camera remained unchanged.  The first two photographs are shown below:

5580.jpg; F11; 1/125s; No Diffuser.

5581.jpg; F11; 1/90s; With Diffuser.
The lighting of the objects is more even when the diffuser is used.  The diffused light is able to "leak" around the edges of the objects.

For the next image a white card was positioned about 3 feet away from the objects on the opposite side to the light and facing it.

5582.jpg; F11; 1/60s; White Card Reflector 3 feet away.

The next image was taken as above but with the white card positioned about 1 foot away from the objects.

5583.jpg; F11; 1/60s; White Card Reflector 1 foot away.

In the second of the two images above the side of the objects furthest away from the light is brighter than in the first.

The white card was then covered with aluminium foil, with the dull side facing the objects.  A photograph was taken.  The foil was then turned round to the shiny side and another photograph taken.

5584.jpg; F11; 1/90s; Dull Foil Reflector 2 feet away.

5585.jpg; F11; 1/125s; Shiny Foil Reflector 2 feet away.

The shiny foil reflected more of the light from the lamp onto the side of the objects furthest away.  More of the shadows were filled with light.

For the last shot the foil was crumpled, straightened out and re-attached to the card, shiny side out.

5586.jpg; F11; 1/180s; Crumpled and Shiny Foil Reflector 2 feet away.

I then compared each of the images and placed them in order of contrast, from greatest to least:

5580; 5581; 5582; 5583; 5586; 5584; 5585.

What have I learned from this exercise?

Using quite simple and easy to produce reflectors, the contrast in an image can be altered significantly.

Friday, 1 July 2011

Photography 1: TAOP, Ex Tungsten & Fluorescent Lighting

Project: Available light.
Exercise: Tungsten & fluorescent lighting.

Part 1.
For the first part of this exercise I found a room that was fairly brightly lit by tungsten lamps.  I turned off any fluorescent lamps.  Just after sunset, when there was only a little daylight left that was weaker than the room lights, I stood close to the window and looked out for about a minute, until my eyes became adjusted.  I then turned around and looked at the room light.  The room light seemed yellow.  After my eyes adjusted for a couple of minutes, it seemed less coloured.  I then quickly looked out of the window again.  The daylight outside seemed blue.

I next measured the light level at various points in the room with my camera's meter.  I took several readings including close to a reading lamp, and in the darkest corner.  I set the aperture to the largest available, F4.5 and recorded the shutter speed:

1/10s; 1/15s; 1/20s; 1/8s (darkest part of room); 1/10s; 1/10s; 1/30s (near reading lamp).

None of these readings would be good enough for hand-held shooting.

I next composed a photo in which both the interior lit by tungsten lamps and the exterior at dusk were both visible.  I waited until the light levels inside and outside were approximately equal, and took 3 photos, as follows: with the white balance set to Auto, with the white balance set to daylight and with the white balance set to tungsten.  The three photos are shown below:

5569.jpg; F11; 1.5s; Auto WB
5570.jpg; F11; 1.5s; Daylight WB
5571.jpg; F11; 1.5s; Tungsten WB
With the white balance set to Auto, the camera has made a reasonable compromise with the colour balance with neither the interior or exterior completely correct.  With the WB set to Daylight, the colour of the daylight is good but the interior light is too yellow.  With the WB set to Tungsten, the interior light is good but the daylight is too blue.

Part 2.

For part 2, I found two different interiors and lit them by compact fluorescent lamps.  I took four photos of each location each identically composed.  The first image was taken with the WB set to Auto, the second set to Daylight Fluorescent, the third set to Neutral Fluorescent and the fourth set to White Fluorescent.  The photographs produced are shown below:

5572.jpg; F11; 1/2s; Auto WB
5573.jpg; F11; 1/2s; Daylight Fluorescent WB
5574.jpg; F11; 1/2s; Neutral Fluorescent WB
5575.jpg; F11; 1/2s; White Fluorescent WB


5576.jpg; F11; 1/3s; Auto WB
5577.jpg; F11; 1/30s; Daylight Fluorescent WB
5578.jpg; F11; 1/30s; Neutral Fluorescent WB
5579.jpg; F11; 1/30s; White Fluorescent WB
In each location, the White Fluorescent WB setting gave the best colour rendition.  This uses a colour temperature of 4200K, the closest to that of the CFLs used  which are calibrated to 2700K, (the colour temperature of a tungsten incandescent lamp).

What have I learned from this exercise?

Tungsten lighting is much weaker than daylight and in most rooms it is very uneven.

Many commercially available fluorescent tubes include a continuous spectrum as well as the bands of light produced by the fluorescent coating to give a more pleasant light.  This means that they can be given an equivalent colour temperature although they can still produce a green colour cast without adjustment to the white balance on digital cameras.