Project: The colour of light.
Exercise: Judging colour temperature.
For this exercise I chose a subject that could be moved around and that did not have a strong colour. I chose to use a straw hat as it was a plain light colour. The photographs were all taken during very clear weather.
Three photographs were taken, one in full sunlight during the middle of the day, one in shade during the middle of the day and one in sunlight when the sun was close to the horizon. The camera's white balance was set to daylight for each of the three shots. The three images are shown below:
Full sunlight, middle of the day.
 |
| 5182.jpg; Pentax *istD; 18-55mm lens; F13; 1/750s; WB Daylight |
Shade, middle of the day.
 |
| 5185.jpg; Pentax *istD; 18-55mm lens; F13; 1/60s; WB Daylight |
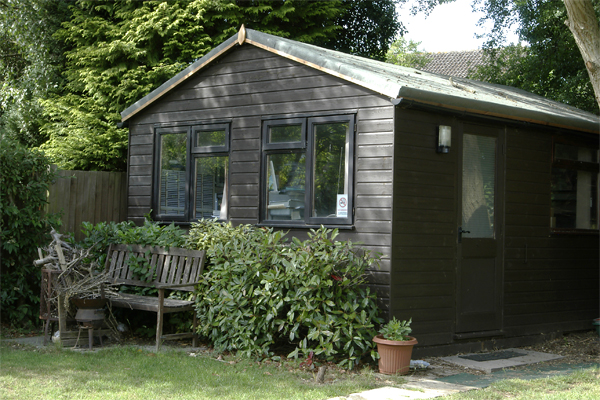
Full sunlight, sun close to horizon (evening).
 |
| 5194.jpg; Pentax *istD; 18-55mm lens; F11; 1/125s; WB Daylight |
The image taken in midday sunlight is lit with a neutral light and gives the truest rendition of the colours. The colours of the image taken in the shade are muted with a bluish cast and look unnatural. The image would look better if it were neutral. The image taken when the sun is close to the horizon has a warmer more orange cast. The orange cast of third image is quite attractive.
Now, I took a similar situation to that in the first part of the exercise and shot the same 3 kinds of picture, but for each one I varied the camera's white balance setting to Daylight/Sunlight, Shade setting and Auto. The nine images produced are shown below:
Full sunlight, middle of the day.
 |
| 5187.jpg; Pentax *istD; 18-55mm lens; F11; 1/1000s; WB Daylight |
 |
| 5188.jpg; Pentax *istD; 18-55mm lens; F11; 1/1000s; WB Shade |
 |
| 5189.jpg; Pentax *istD; 18-55mm lens; F11; 1/1000s; WB Auto |
Shade, Middle of the day.
 |
| 5190.jpg; Pentax *istD; 18-55mm lens; F11; 1/90s; WB Daylight |
 |
| 5191.jpg; Pentax *istD; 18-55mm lens; F11; 1/125s; WB Shade |
 |
| 5192.jpg; Pentax *istD; 18-55mm lens; F11; 1/125s; WB Auto |
Full sunlight, sun close to horizon (evening).
 |
| 5195.jpg; Pentax *istD; 18-55mm lens; F11; 1/180s; WB Daylight |
 |
| 5196.jpg; Pentax *istD; 18-55mm lens; F11; 1/180s; WB Shade |
 |
| 5197.jpg; Pentax *istD; 18-55mm lens; F11; 1/180s; WB Auto |
For the images taken in the full sun, image 5187, with daylight white balance setting has the truest colour tone. Image 5188, with shade white balance setting is too yellow. Image 5189 with Auto white balance setting has muted colours with a "bleached out" look.
For the images taken in the shade in the middle of the day, image 5190 with daylight white balance setting has corrected for the shadow light well but has a slightly bluish cast. The colours are more muted. Image 5191, with shade white balance setting has produced a well exposed image. The colours are natural. Image 5192, with auto white balance setting has muted colours with a more of a bluish cast than with that produced with the daylight setting.
Image 5195, taken with a daylight white balance setting has the best rendition of colours of the three taken in full sunlight with the sun close to the horizon. The warm orange tone looks natural and is quite attractive. Image 5196 is too orange and image 5197 has an unattractive, desaturated look.
What have I learned from this exercise?
A warm, orange tone adds impact to a photograph. Warm colouration in a picture is much more inviting than a cold cast as it gives the viewer a feeling of well being. When shooting a subject that is in shade with a bright blue sky, setting the camera's white balance setting to shade effectively counteracts the cold colour cast produced.
Conveying a feeling of cold and isolation in a bleak landscape is a classic use of cool-tones. To give an image a cool-tone, use a white balance setting with a colour temperature lower than the light that you are shooting in (in daylight 5,500K, use an Incandescent 3,000K setting, for example).
When shooting autumn colours, when the sun is higher in the sky during the middle of the day the higher colour temperature makes your images appear more blue. This cooler light is not the best for capturing autumn colours. You can compensate for this by using a Cloudy white balance setting.
For shooting portraits in varied lighting conditions, the best solution is to shoot in RAW mode and adjust the white balance when the images are processed.
Interesting effects can be obtained by using colour casts caused by mixed lighting. Setting the white balance for the artificial lighting used for many interiors at dusk can turn the sky a strong blue, (see David Churchill).
In each of the sets of photographs above, the best image is produced by using the correct colour balance setting for the conditions rather than the Auto setting.