Assignment 1: A Portrait (Revised)
Original version can be found at: 10/02/2012
Critical assessment of finished assignment images:
 |
| Reclining Subject |
In this image the subject is in a relaxed pose. The
light from the window has provided an interesting lighting effect. The
pose has allowed the subject to remain relaxed while the photograph is
taken. The plain background has helped to keep the focus on the
subject. The diagonal lines and triangle formed by the subject's
supporting arm add interest to the composition.
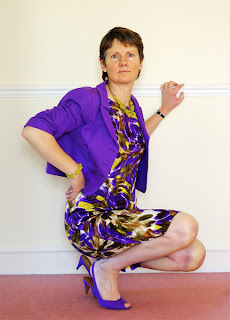 |
| Squatting Subject |
|
|
|
|
|
|
|
|
|
In this portrait the subject
is shown in a squatting position. I asked the subject to adopt this
pose to make for a more dynamic portrait. This has been successful
because the angles created by the subject's arms and legs create some
movement in the image. Again the plain background has helped to keep
the focus on the subject.
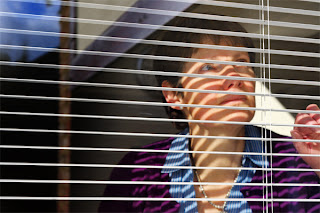 |
| Through a Blind |
In this image the subject is looking at something
other than the camera, implying at once a passive pose to be looked at
rather than admired. There is no confrontation with an implied viewer.
The photograph was taken from outside, looking in. By placing the
focus on the slats of the window blind the subject is not quite sharp.
This has reinforced the lack of confrontation with the viewer. If
creating this image again I would attempt to reduce the amount of
background detail in the image. This could be achieved by experimenting
with a wider aperture.
When
viewing the photograph we are physically distant from the subject even
though they appear to be seen at close range. As in Walker Evans' photo
"Alice Mae Burroughs, Wife of a Cotton Share-cropper, Hale County,
Alabama, 1936, The solemnity of a direct confrontation between the
photographer and subject is not present. It has been replaced by a more
casual sort of encounter. There is no staring here, no clinical
examination. The subject is not tightly contained by a strictly frontal
pose. The subject appears unaware of the photographer and therefore is relaxed and not hiding behind her "performance face".
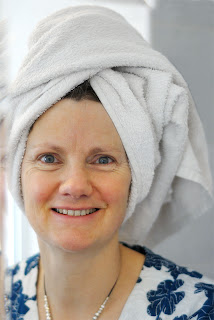 |
| Reflection |
This image is of the reflection of the subject in a
bevelled bathroom mirror. The light was provided by window light,
reflected onto the subject's face by the mirror. This has provided good
all round lighting of the subject. A wide aperture was used to give a
shallow depth of field. If I were to repeat this portrait I would use a
wider aperture to blur out some of the distracting background detail.
The colour in the subject's face and clothing stands out well against
the almost monochrome background. Some of the background detail and the vertical line on the left have been removed in this revised image. These parts of the image were distracting and now the overall effect is stronger. I also lightened the eyes a little to remove some of the shadow as this is where the focus is in the image.
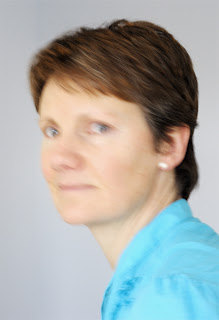 |
| Moving Head |
This portrait was shot using window light reflected
from a mirror placed in front of the subject. The subject was asked to
turn her head towards the camera while the photograph was being taken. A
slow shutter speed was used to blur the image. The portrait has been
successful in that the subject and her character are still recognisable
even with the blurring of her features. The objective of the technique
was to make the face and hair of the subject look smooth and perfect.
This has been achieved.
The inspiration for this
photograph was Gerhard Richter's "Betty, 1988". The blurriness of
Richter's image was a reference to the soft focus technique of early
20th century Pictorialism, intended to dignify camera images by
associating them with the visual properties of impressionist painting
and non-photographic printmaking practices.
 |
| Walking Past |
This image is from a shoot of moving subjects. The
subject was walking past a doorway while the photograph was taken. The
lighting was provided by light from a window behind the camera. The
success of this image is due to the fact that the subject is captured in
a relaxed walking pose. The blur adds to the sense of motion. If this
portrait was to be recreated I would have kept the background sharper
by placing the camera on a tripod, as this would have improved the sense
of movement. Also avoiding the dark column at the right of the image
would have improved the image.
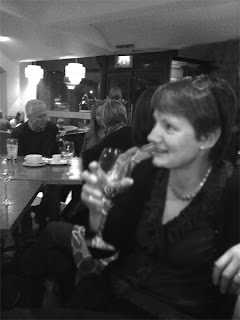 |
| Blurry Subject |
This photograph was shot during the evening in a bar
on a camera phone. The lighting conditions were low and difficult for
such a simple camera. Because the apparent subject is unexpectedly
blurry, confusion and ambiguity is created. Hopefully the viewer is
forced to ask, "what is the subject of this picture?". The experience
of looking changes from passive to interrogative. I have also attempted
to capture emotion by producing an image that is grainy and seems
hastily composed. I believe that the image is successful in achieving
this aim. If this portrait were to be re-created using a better quality
camera, more able to cope with the difficult lighting conditions a
better result could be achieved.
The inspiration for
this image was a photograph by Robert Frank, called "Movie Premiere,
Hollywood, c.1954". By making the foreground subject blurry and the
background spectators in the image sharply focussed, he has created
tension between two optically different worlds, and reversed the
conventional optical scheme.
Skills
I
need to strengthen my skills in the use of different apertures to
achieve various depths of field. This would enable my images to either
include or exclude background detail as required. I also need to
improve my skills in making the subject relaxed so as to create more
interesting portraits.
I hope to improve my skills in these areas by creating more portraits using different types of lenses and apertures.


